Showing posts with label sewing. Show all posts
Monday, August 11, 2014
doily lion by the bushcrafter
Look what I've won! Jenny of the Bushcrafter had a giveaway (a looooong time ago, sorry for the delayed winner post, Jenny!) and I won this dead gorgeous plush lion made from a recycled doily. The lion is so adorable with its facial expression created by Jenny. I love him!
Be sure to check Jenny at the Bushcrafter out, because she is a true inspiration when it comes to both traditional and untraditional handicrafts!
Labels:
animals,
crafts,
decoration,
design,
emboidery,
giveaway,
Inspiration,
recycle,
sewing,
vintage
Tuesday, February 25, 2014
upcycled doll quilt
We had a bag of grown out and worn out clothes. I wanted to make some rag rugs and the kids wanted to re-design. They cut off sleeves and cuffs, patterns and prints and made new use of the old.
I made something I had wanted to do for a loooooong time: a quilt. I am not patienced, nor am I skilled in the art of quilting, so a small doll quilt was enough to still my abstinence without me getting fed up and stop in the middle of the sewing.
I cut squares from kids's t-shirts, long sleeves, onzies and tights, neatly using all fabric from the small garments. After sewing the squares together I used the back of my husbands old jersey cardigan for the back of the quilt. I cut the back about 1 cm bigger on every side, folded the jersey fabric over to the front of the quilted piece, and just sew along the sides leaving a rough edge.
I calmed by anxious quilting nerves with this two hour project. And my daughter have great use for it when putting her doll to sleep in her bed or stroller.
Maybe you have got some old clothing you can upcycle to something useful?
All the best!
Sofie
Labels:
children,
crafts,
environmentally friendly,
family,
home,
Inspiration,
recycle,
sewing,
toys
Monday, November 25, 2013
att köpa på Etsy
Drar du dig för att köpa produkter från Etsy? Det är inte krångligt alls! Jag hittade en kort guide på finska, som kanske hjälper dig som vill shoppa på Etsy. Vill du hellre läsa engelska finns kan du läsa Etsys egen guide!
Nu finns Typografikalender 2014 att köpas i min Etsy-shop. Kanske du vill köpa den?
Även om du inte vill det så rekommenderar jag dig varmt att klicka runt på Etsy och bläddra igenom sida efter sida med fantastiskt fina handgjorda kreationer eller secondhandgrejer.
På bilden ser du Kajsa Wikmans shop. Ett hett tips!
Allt gott!
Sofie
Labels:
art,
crafts,
decoration,
design,
Fia Lotta Jansson Design,
graphics,
Inspiration,
second hand,
sewing,
shop
Wednesday, October 9, 2013
DIY bean bags
Way back I made bean bags together with the kids. The bean bags were a birthday gift for a boy turning three. It is a simple and fun project.
Cut out squares of fabric, two pieces of each fabric. Pin them right sides facing and sew along the sides, leaving an opening. Thanks to that opening you'll be able to turn your bag right side out and fill the bag with beans.
One bag turned right side out. See the opening?
I used a funnel to get my beans, or peas as I used, into the bags. In Finland they are called ärtpåsar, which is Swedish for pea bags. It wasn't the best equipmen, the peas got stuck on their way down through the funnel. Had I left a bigger opening in the fabric when sewing I could have filled the bags easier. You learn from experience.
The kids helped me with the peas.
Close the opening with sewing some stitches by hand and voilà:
The fabrics are second hand.
Saturday, March 23, 2013
DIY easter (a look in the rearview mirror)
Here are a few DIY's I've blogged about in the past. As Easter is storming in I wanted to re-blog 'em. Above is a pic of my fabric and paper decorations.
This one is a real quicky: Last minute Easter decorations.
And why not try the Paper Easter grass DIY or better: the Maria Montazami inspired tassels decoration!
Have you got any DIY tips for me?
Hope you all have a good weekend!
Sunday, February 24, 2013
ett projekt för en fyraåring
Sin ringa ålder till trots sydde Elmer, med sin tålamodsprövade och nervösa mor till hjälp, en påse för småsaker. Detta var förra sommaren. Han är mycket intresserad av motordrivna saker och han var mycket nöjd att använda symaskinen och kunna se resultat av användandet.
Visst blev påsen fin!
Och mor och son blev stolta!
(To read this post in English, use the Google translate on the right side under my profile picture.)
Rekvisita.
Önskar er alla en bra start på er vecka!
Tuesday, December 18, 2012
X-MAS DIY: cushion covers
One of my home decor DIY's I am really pleased with. Very simple to make, great result!
I found the red-purple rya at Stadsmissionen in Gamla Stan. Love it! I've wanted to make cusion covers from steady wool material so the rya got to come home with me. The material for the blue cushion was thrifted at my local Myrorna.
I used:
- a thrifted rya
- one coloured cushion cover
- an embroidered strip of fabric
- wool yarn and a big needle
1. I started with the rya. Folded it, right sides facing. I did not want the fringe to be visible on the finished cusion cover, so I sewed a simple running stitch beneath the fringe, so that when I turned the project inside out the fringe stayed on the inside.
2. When the project is turned inside out ande you've got the right side facing you, you continue sewing the sides of the cushion cover. I used a blanket stitch (see video instructions here) for the sides. Start with one side. Then stuff your cover with a cushion before you stitch the other side together. And you are done!
For the second cushion cover I just sewed the embroidered fabric strips directly onto the second hand cushion cover with a running stitch. I folded the short side ends in before stitching so that they would not fringe. That is about as simple a refashion you can get!
Happy crafting!
Labels:
crafts,
decoration,
emboidery,
furniture,
home,
Inspiration,
recycle,
refashion,
second hand,
sewing,
thrifting,
tutorial,
xmas diy
X-MAS DIY rerun: fake quilt cushion cover
On the topics of cushion covers, here is another tutorial I made a year ago: Fake Quilt Cushion Cover.
Share the fun!
Happy Tuesday!
Labels:
colour,
crafts,
decoration,
design,
home,
Inspiration,
recycle,
sewing,
tutorial,
xmas diy
Sunday, December 16, 2012
X-MAS DIY: gift tags
This is the material I used:
- recycled cardstock, any kind of thicker paper will do though
- fabrics, this is perfect for all your small leftover pieces of fabric
- zig zag scissors
- metal grommets
- sewing machine (the tags can also be made by using needle and thread)
- twine
1. Cut the cardstock into desired shape. Punch a hole in one end.
2. Cut small pieces of fabric to fit the cardstock tag. I used a zig zag scissors to make the edges look nice, but also to prevent them from fraying.
3. Sew the piece of fabric onto the cardstock tag. Make sure you use a separate needle when sewing paper. It will get dull, so you need to change the needle when going back to sewing only fabrics again! I used different colours of thread to match the fabric.
4. Hammer the grommet into place. Read the instructions on the grommet package to do right.
5. Thread twine into the grommet to finish off this project.
Happy crafting!
Labels:
colour,
crafts,
decoration,
Inspiration,
paper,
recycle,
sewing,
tutorial,
xmas diy
Tuesday, November 27, 2012
X-MAS DIY: gift calendar
You can vary the material and take whatever you've got at home! My goal is always to use what I got lying around in our home. Or shop the material at thrift shops. Why buy new things when you can reuse!
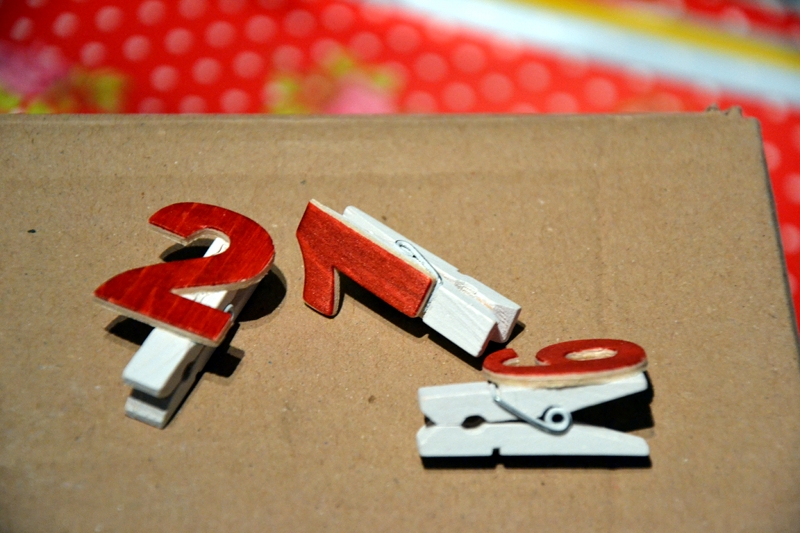
I had the mini clothes pegs and wooden numbers in my stash, I finally found use for them! You can cut out numbers in cardboard and use normal size pegs. In that case make sure to use a steady fabric to hold the pegs up.
You will need:
- fabric for the "container"
- sewing machine or needle and thread
- iron
- pins
- ruler
- wooden numbers (or cut out numbers in cardboard)
- clothes pegs
- coloured marker
- coloured thread for decoration (optional)
The graphic does not show the exact measures. Use a ruler to make paper templates or measure directly onto fabric!
1. Cut the pieces of fabric out. Take out your sewing machine, or your needle and thread.
(These are the trouser I cut into.)
2. Start with the strip. Fold it longsides with the right sides facing (if you are using a patterned fabric). Sew the longside. Zig zag the edges for better durability. Turn the "tube" right side out. Lay it flat and iron, you can choose to place the seam on the side or on the middle. Save the strip for later.
3. Take the two rectangular pieces. Sew each piece separately, right sides facing, B-side to B-side. Now you'll get a bigger "tube". Turn one of the tubes right side out. Place that one inside of the other tube. Now sew the A-sides together.
4. Turn the tube wrong side out. Take your fabric circles and start pinning them to the end openings (A-sides) of the tube. Right side down (see picture below). Sew patiently. Leave an opening on one of the circles, about 4-5 cm, then you will be able to turn your container inside out later. When you have attached both circles, turn the container inside out through the opening. Iron the straight seams.
5. Now tuck half of the tube and the end with the opening into the other half of the tube, so that you get a "container". Fold over the edge (see picture below).
6. Take the strip, make a hook and attach it to the container, either with sewing machine or needle and thread. Place it over the seam to get a neat finnish.
7. Take the numbers and paint them if you want. You will need these numbers:
0, 1, 1, 2, 2, 3, 4, 5, 6, 7, 8, 9. You can also draw the numbers yourself and cut them out of thicker paper. (If you don't want to draw you can use computer and printer!)
6. Glue the numbers onto the pegs, one number on each peg.
7. And there you go! Every day, from the first day of December, you can change the date by changing the numbers. I made gifts from a 24-piece puzzle, simply one piece per day. The kids liked it! They looked forward to seeing the whole picture on Christmas Eve.
I hung our advent gift calendar in our kitchen window, then it was the first thing they saw in the morning.
Happy advent!
Subscribe to:
Posts (Atom)


.jpg)
.jpg)


